
Ten Thousand Transactions
A dress made with 10,000 paper cranes and only thermal receipts

Gallery


The Creation Process

Collecting Receipts
The longest receipt I found produced 12 squares, and was around 38 inches long. This was one of 4,600 put into the entire project. On average the receipts could give me 2 or 3 paper cranes which was between 7 and 10 inches long. They come in two different sizes as well, two inches wide and three inches wide.
Utilizing the Scraps
After I cut up each receipt, I would save the little scraps for later. They became handy for making paper, beads, and even the bodice.
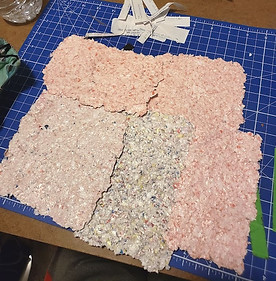
By blending the scraps up inside a coffee grinder, I was able to remake the paper in my own unique way. I would then soak the pulp in water and pour it over a screen. I shaped it, sponged the water out, let it dry, and ultimately glued both sides to prevent it from falling apart. This multicolored and thick new paper would be perfect to cut shapes out of. Feathers to be more specific, both small and large.


6 large feathers
108 small feathers
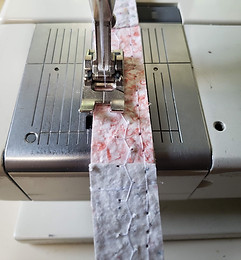
The leftover paper pieces were perfect for making sturdy straps and a belt. I sandwiched two strips of the paper together with some scrap plastic in between and machine sewed them together. This made a flexible and strong piece that I could either add buckles to or snaps.


All of the small feathers were embroidered with beads. To make them, I took a toothpick and carefully rolled some paper around it. As I rolled, I added a little bit of mod podge to it in order to bond it all together. After it dried I painted each one on an edge, either black or silver. This made them pop in a subtle way. Then I sewed the beads onto each of the feather's edges. They took anywhere between 10 and 20 minutes to embroider. There are approximately 1,650 beads on the garment's bodice.


Once all the feathers were embroidered, I needed a bodice to sew them onto. To make it, I paper machèd my mannequin, which had recycled plastic draped over it. After layering it with receipts and glue several times, I was able to take it off and start hand sewing the feathers on.


Making the Skirt
While thrift shopping one day, I found a ton of rolls of Popeye's receipt paper that had been printed in 2012. I couldn't pass on taking them so I grabbed some and used one for the skirt. By overlapping them halfway across each other and gluing them together, I created a giant sheet of paper. It was the perfect size for a half circle skirt, not too big or too small. Once that was done, I wanted to make a lining because I knew that the paper would not hold up after sewing the origami cranes to it. The lining was made of a brown stretch fabric I collected from my old job's scrap bin.


After the skirt was made and I had folded all 10,000 paper cranes, I began to sort and color them. I took 3,000 and used the heat from a hair straightener to make half of each crane black. From a distance it would give the illusion that they were actually gray. For some of these, I was able to color them before folding.


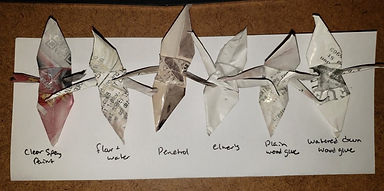
During the whole process of making this dress, I was experimenting with products that preserve or change the color of thermal paper. The goal was to find one that I could easily apply to the white and gray cranes in order to protect the wearer from BPA exposure, and one that would transform the receipt cranes into either dark gray or black. What I ended up using was Plasti-Dip Glossifier to seal the white and gray cranes, and Loctite spray adhesive to change the color of the other 5,000. This was done after they had been sewn onto the skirt.


Here are some of the photos I took while sewing each crane with the help of my mascot, Willow
_edited.jpg)

_edited.jpg)
Spraying the skirt with spray adhesive was the final and most fun step in this whole process


What are Receipts
Thermochromatic (thermal) paper is what most companies use for receipts. This paper has two layers, a base layer and a thermal sensitive layer. The base layer is regular paper, but the thermal sensitive one is made of three components. A thermochromic dye on the bottom, acidic developer in the middle (this layer contains Bisphenol A or S), and on top is a solvent. When heat is applied, the solvent and developer mix and turn black. Many different things can cause the layers to mix, for example alcohol or UV rays from the sun will alter the appearance of the paper. Due to the makeup of thermal receipt paper, they are unable to be recycled.
Many studies have shown the harmful effects of Bisphenol A (BPA), which receipts are covered in. They are known as endocrine disrupters and can cause many health problems including breast cancer and hormonal imbalance in general. It's wise to never handle your receipt too much or use hand sanitizer after touching one because this will cause the BPA to absorb much more into your skin. Although there aren't nearly as many studies on BPS, they still are known to be quite harmful.
This was a dangerous project to work on, but I made sure to wear gloves and a mask as much as possible. I would not recommend experimenting or creating with thermal paper unless you have done research on it. Things like wearing gloves and even eating a lot of cruciferous vegetables will help with BPA exposure in general.